VineLinux4.x/サーバ管理/MRTGのインストール
Last-modified: 2018-02-03 (土) 09:34:03 (2720d)
概要 †
MRTG(The Multi Router Traffic Grapher)は、ネットワークのトラフィックや各種統計をグラフにして視覚的に表示することができます。
設定手順 †
事前にnet-snmpをインストール †
# apt-get install net-snmp
snmpd.confの編集 †
# vi /etc/snmp/snmpd.conf
# First, map the community name "public" into a "security name"

#       sec.name  source          community
#com2sec notConfigUser  default       public
com2sec local localhost private
com2sec mynetwork 192.168.0.0/24 public

# Second, map the security name into a group name:

#       groupName      securityModel securityName
#group   notConfigGroup v1           notConfigUser
#group   notConfigGroup v2c           notConfigUser
group MyROGroup v1 mynetwork
group MyROGroup v2c mynetwork

# Third, create a view for us to let the group have rights to:

# Make at least  snmpwalk -v 1 localhost -c public system fast again.
#       name           incl/excl     subtree         mask(optional)
#view    systemview    included   .1.3.6.1.2.1.1
#view    systemview    included   .1.3.6.1.2.1.25.1.1
view all included .1 80

# Finally, grant the group read-only access to the systemview view.

#       group          context sec.model sec.level prefix read   write  notif
#access  notConfigGroup ""      any       noauth    exact  systemview none none
access MyROGroup "" any noauth exact all none none
access MyRWGroup "" any noauth exact all all none

#disk / 10000
disk / 10000
snmpdの起動 †
# /etc/rc.d/init.d/snmpd start
snmpdを起動中:                                             [  OK  ]
自動起動の設定 †
# chkconfig --level 3 snmpd on
# chkconfig --list snmpd
snmpd           0:off   1:off   2:off   3:on    4:off   5:off   6:off
MRTGのインストール †
VinePlusにRPMがありますのでwgetします。
# wget http://www.ring.gr.jp/pub/linux/Vine/VinePlus/4.2/i386/RPMS.extras/mr tg-2.16.1-0vl1.i386.rpm
RPMをインストールします。
# rpm -ivh mrtg-2.16.1-0vl1.i386.rpm
MRTGの画像ファイルを、httpdのホームディレクトリにコピーします。
# cp /var/www/mrtg/ /home/httpd/html/
MRTG出力ディレクトリのエイリアス及びアクセス制限を適宜変更します。
# vi /etc/apache2/conf.d/mrtg.conf
mrtg.cfgの編集 †
# vi /etc/mrtg.cfg
### Global Config Options

#  for UNIX
WorkDir: /home/httpd/html/mrtg

### Global Defaults

#  to get bits instead of bytes and graphs growing to the right
Options[_]: growright, noinfo
Options[$]: growright, noinfo

EnableIPv6: no
Language:eucjp

### Interface 2 >> Descr: 'eth0' | Name: '' | Ip: '192.168.0.2' | Eth: '00-d0-59-83-c3-74' ###

Target[eth0]: 2:public@192.168.0.2:
SetEnv[eth0]: MRTG_INT_IP="192.168.0.2" MRTG_INT_DESCR="eth0"
MaxBytes[eth0]: 12500000
Title[eth0]: Traffic Analysis for eth0
PageTop[eth0]: <h1>Traffic Analysis for eth0</h1>

### CPU Usage ###
Target[cpu]: .1.3.6.1.4.1.2021.11.50.0&.1.3.6.1.4.1.2021.11.52.0:public@192.168.0.2
MaxBytes[cpu]: 100
Unscaled[cpu]: dwmy
Options[cpu]: nopercent
YLegend[cpu]: CPU Usage(%)
ShortLegend[cpu]: (%)
LegendI[cpu]: ユーザー
LegendO[cpu]: システム
Legend1[cpu]: ユーザー(%)
Legend2[cpu]: システム(%)
Title[cpu]: CPU 使用率
PageTop[cpu]: <H1>CPU 使用率</H1>

### Memory Free ####
Target[mem]: .1.3.6.1.4.1.2021.4.6.0&.1.3.6.1.4.1.2021.4.4.0:public@192.168.0.2
MaxBytes1[mem]: 384444
MaxBytes2[mem]: 779144
Unscaled[mem]: dwmy
Options[mem]: gauge
#Factor[mem]: 1000
#YTicsFactor[mem]: 1000
YLegend[mem]: Mem Free(Bytes)
ShortLegend[mem]: Bytes
kilo[mem]: 1024
kMG[mem]: k,M,G,T,P
LegendI[mem]: Real
LegendO[mem]: Swap
Legend1[mem]: 空き物理メモリ(MBytes)
Legend2[mem]: 空きスワップメモリ(MBytes)
Title[mem]: 空きメモリ量
PageTop[mem]: <H1>空きメモリ量</H1>

### Disk Used ####
Target[disk]: .1.3.6.1.4.1.2021.9.1.9.1&.1.3.6.1.4.1.2021.9.1.9.1:public@192.168.0.2
MaxBytes[disk]: 100
Unscaled[disk]: dwmy
Options[disk]: gauge, nopercent
YLegend[disk]: Disk Used(%)
ShortLegend[disk]: (%)
LegendI[disk]: Disk Used
LegendO[disk]: Disk Used
Legend1[disk]: ディスク使用率(%)
Legend2[disk]: ディスク使用率(%)
Title[disk]: ディスク使用率
PageTop[disk]: <H1>ディスク使用率</H1>
MRTG実行 †
# /usr/bin/mrtg /etc/mrtg.cfg
WARNINGが出る場合は、WARNINGが出なくなるまで何回か実行します。
インデックスページの作成 †
出力されるHTMLの日本語が文字化けする可能性があるので以下のファイルを修正します。
# vi /usr/bin/indexmaker
306行目あたり
   <meta http-equiv="content-type" content="text/html; charset=iso-8859-15" >
   ↓
   <meta http-equiv="content-type" content="text/html; charset=iso-euc-jp" >
インデックスページの作成
# indexmaker --columns=1 /etc/mrtg.cfg > /home/httpd/html/mrtg/index.html
CRONへの追加 †
うまく動作しているようであれば、5分ごとに自動実行されるようにCRONへ登録します。
# crontab -e
以下を追加
0-59/5 * * * * /usr/bin/mrtg /etc/mrtg.cfg
動作の確認 †
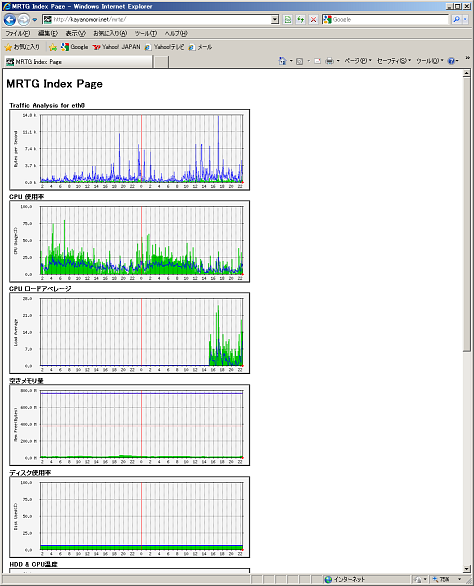
ウェブブラウザにて、http://ホスト名/mrtg/index.htmlにアクセスして表示されればOK。

